PRINTING
PLANS & TAKEOFFS
Note: Print to scale feature is not
available from Toolbox. To print plans to scale click
here.
You may choose to print either your entire
drawing or only the visible window. You may also
choose to print the background e-print (plan) or the overlay that
you create when you measure on top of it (drawing). Printing your measured
values creates a report that includes
everything you’ve measured
on all pages of your drawing.
There are three ways to print plans. All of them require that
you first open the Drawing screen.Toolbar method:
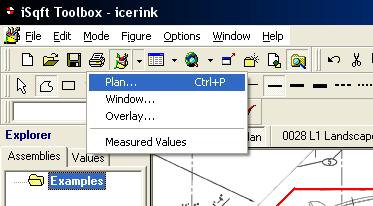
From the toolbar at the top of the screen, select File.
From the drop down menu
that appears, select Print.
From the next drop down menu, select one:
1. Plan, which will print the original
e-print, without your drawing.
2. Window, which will print exactly what
you see on the Drawing screen.
3. Drawing, which will print the overlay
that you drew. The Print dialogue box will appear. Be sure that all of
the information is correct. At this point, you can left click on the Print
button. However, if you want to see what the page(s) will look like before
you print them, left click on the Preview button. If what you see is what
you want to print, press the Print button. If not, left click on the Close
button and correct any changes you want to make. Repeat this process until
you are ready to press the Print button.
Printing the Takeoff Workbook
There are three ways to print your Takeoff Workbook. All of them require
that you first open the Takeoff Workbook.By default, the iSqFt Toolbox
will determine the range to print by determining the last row with data
in each workbook sheet. You may set the print range manually by highlighting
the range you desire to print. If more than one cell is selected when you
print any of the workbooks, that selected range will print and the Toolbox
will not attempt to determine the print range.
There are three methods for printing
your Takeoff Workbook:Toolbar method:
From the toolbar at the top of the screen, select File.
From the drop down menu that appears, select Print.
From the next drop down menu, select one:
1. Takeoff, which prints the Takeoff Workbook according to the print range
you have selected.
2. Measured Values, which is a listing of all values measured
either on-screen.
The Print dialogue box will appear. If necessary, press the Properties
button and be sure that all of the information on all tabs located there
is correct. At
this point, you may left click on the Print button. However, if you want
to see what the page(s) will look like before you print them, left click
on the Preview button. If what you see is what you want to print, press the
Print button. If not, left click on the Close button and correct any changes
you want to make. Repeat this process until you are ready to press the Print
button.