DesignJet 500 v6.03
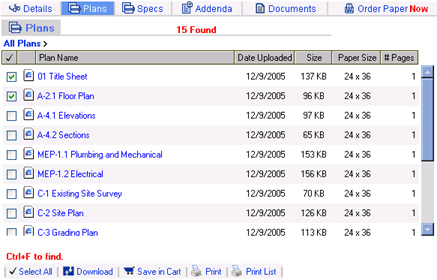
The first step in printing is to select the plan you want to print from the list. When you are on the plans tab of a job, check the box for the plan you want to print. You can select more than one, or use the Select All button at the bottom to automatically check all the plans. Then click the Print option at the bottom of the window.
The Select Print Options box will display. Choose the HP 500 Plotter from the printers. Then choose Match printer resolution under the heading Auto scale in the lower left corner. It is recommended to check the Automatic orientation box as well as that will automatically rotate the drawing to best fit the page.
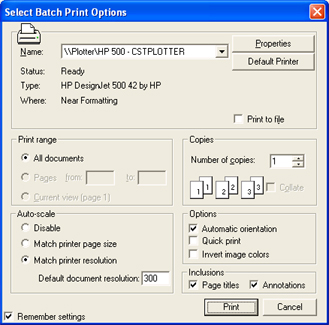
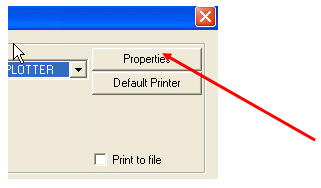
Next, click on the Properties button in the upper right corner of the window
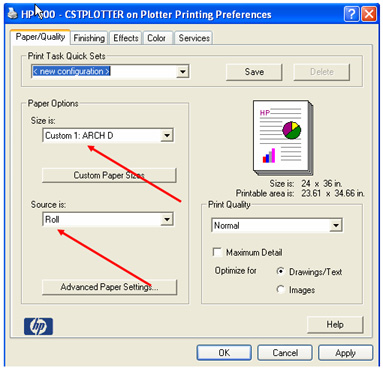
Under Paper Options, click on Custom Paper Sizes. This will allow you to choose your sheet size.

The Paper Sizes box will appear.
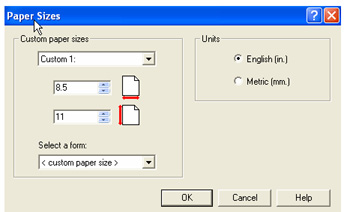
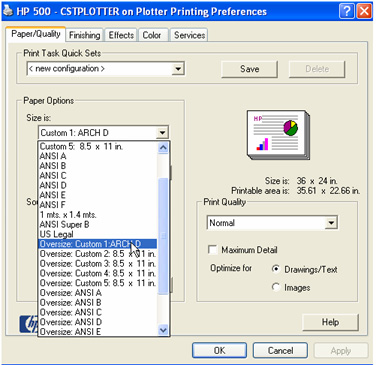
Below Custom paper sizes, choose Custom1, and then under
Select a form choose your sheet size for Architectural. In this example, 24 x
36 is Arch D.
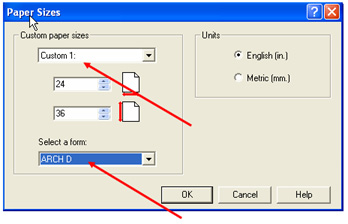
Click OK at the bottom. Your sheet size will be listed
under Size is:. Make sure Source is: reads Roll if you have a roll in the
plotter.
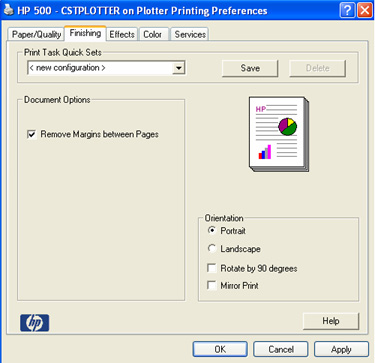
Then, click on the ‘Finishing’ tab at the top. Under Document Options, check the box next to Remove Margins between Pages. This will remove the margins in the plotter and ensure you are printing the entire document. It will eliminate any cutting off at the edges. Then, click ‘Apply’ and then ‘OK’ at the bottom.
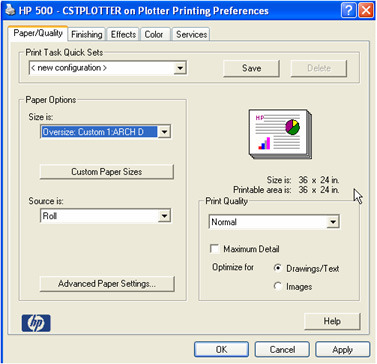
If your drawing is still cutting off an inch or so at the bottom or right side, you may need to expand the printable area. Please try the following:
Click on the Paper/Quality tab at the top of the Printing Preferences screen. Notice to the right that the Printable area is: may be smaller than your sheet size.
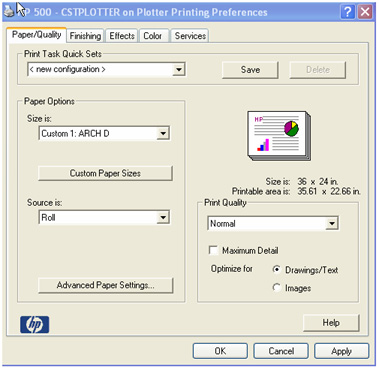
If that is the case, go to Size is: and select an oversize paper size. If you do not have an oversized paper size, you can select Custom Paper Sizes and then manually change the dimensions of the drawing to compensate for the amount that is getting cut off. For example, you could set the dimensions to 24x37 if the plan is cutting off an inch to the left or right side of the drawing.
The Printable area is: section will now match the Size is: section if you have an oversized paper size selected. If you entered a custom paper size it should now show your new printable area.
Then click OK at the bottom. And then click Print. The drawing will print to scale now on the plotter.
If you receive an error message on the plotter itself or have plotter problems, please contact HP Support at 1-800-HP-INVENT or 1-800-474-6836.